Monkey Boy Animations Blog

RSS
  • Blog
  • About Me
  • Contact Info
  • Portfolio
  • Final Year Project
  • Showreel


July 2011 Showreel


  Week 2 Over In A Flash...

Jan 24, 2012 by sd | 2 comments | Tweet Post | Share Post | Email Post
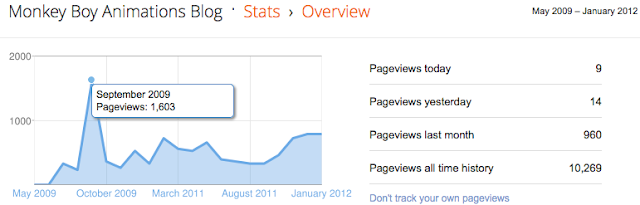
So let me start by saying sorry if the new linking system coursed you any inconvenience, from now on i'll be using the adf.ly short url site as for roughly every 1,000 clicks i get on my links i receive $1, although i dont see myself making much from this as my highest blog view was back in September 2009 when i had 1,600 views i still feel it was worth trying out.


For the people that came here from other means and dont know what im talking about.....when you click a adf.ly link to my blog it will take you to an advert page with a 5 second countdown on the top right corner of the screen, once that reaches 0 it will say "skip ad", just click on that and it will bring you here.....if this gets annoying for people please just leave a comment in any of my posts and if enough people find it a hassle i will set it back to normal.

Thank you for your time......

Now on to the animations, so i just finished week 2 of my new schedule and i must say its going rather well, i had a few issues the other day and for the last 2 days i've been feeling really ill (hence why its taken me 2 days to post) but other then that its all goes great.

I started off this week with a good old bouncing ball excessive as part of the Guardian course and as part of the Slow In & Slow Out class, the task was the have the ball go through 4 different stages starting with a linear up and down motion and ending with a slow in and slow out motion on both the up and down.


Link To Video


I started by placing keys at frame 0, 15 and 30 then using the inbetweens that the computer had already put in there i set a key at frame 13 and moved it back to frame 9, this gave me a slow in on the up of the bounce and i repeated this process for the slow out. this offered a smooth movement and it utilized the computers spacing to get the result i was looking for.

I use this same technique for the slow in and out for the down as well and the combined the 2 to get the final result of slow in and out on both the up and down.

Class 8 was focused on Arcs and how they are present in every organic movement we do so should be studied in great detail.
The Task was the have the ball bounce across the screen in a zigzag and then add breakdowns either side of the first up to create an arc in the movement instead of having it look jagged and sharp.


Link To Video


During this class i found a really useful tool in Maya that i hadn't known about previously which was the Motion Trail option in the Animate menu.

This tool will plot out the motion of the object that it is linked with, to use it this is what you need to do.

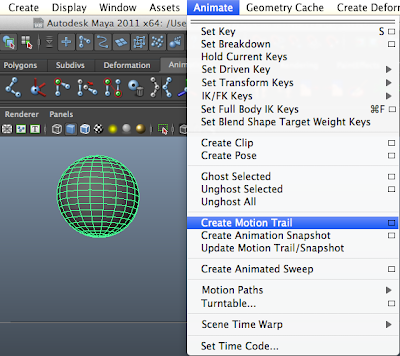
Select the object you which to see the tangency of and in the Animate menu click on Create Motion Trail, if you want to get more options click on the small box next to it and the options window will open.

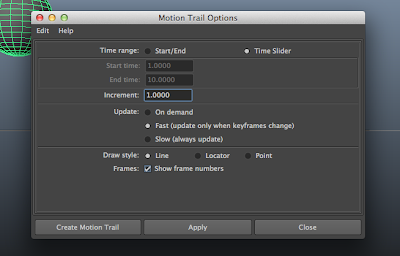
In the options menu you can choose the time rage, the increments of where you want to points to be placed (every 2 frames, every 6 frames, etc) and how it is updated....if you are fine tuning your arcs i would suggest having it on Fast (Update only when keyframes change), there is also the option as to how you would like the points to be displayed, you can choose from a Line which will create a lone between every point and how you exactly where the object will be, Locator which basically shows Nulls where points are and Points which does basically the same thing as Locator but less messy.

there is a final option that called Frames which is the frame number, i have this turned on as you can then see what frame number everything is happening without having to look through the timeline.

Once you have selected all the options you want you will have something that looks like this....
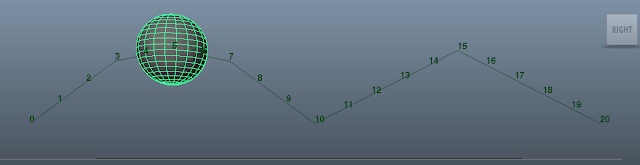

If once the points are plotted you dont like the way it looks, it can be changed very easily in the Outliner....just go into the Outliner and select motionTrailHandle and then in the Channel Box on the right hand side of the screen there will be the option to change some of the setting you had already picked such as the Draw Style (Line, Locator, Point) and if the frame numbers should be displayed.
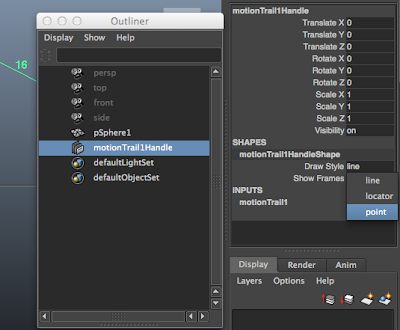

the great thing about this this option in Maya is that its constantly updating (depending on which option you picked in the options menu) so when you move the object it will correct the line to match the changes made.
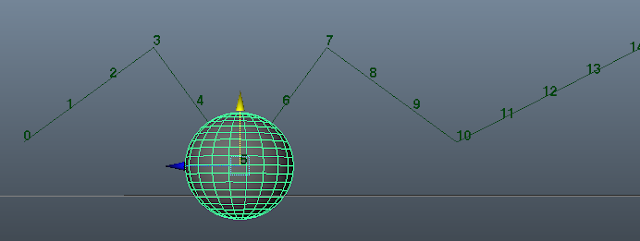

I hope that helps others when they are looking for a way of fine tuning there animations....

So the last practical class of the week was secondary action, now this lesson was a little confusing to me and im not sure if i fully understood it but i followed the notes as best as i could and i hope that it goes into more detail on the subject in later lessons so i can get a better grasp on it.

The task was to create a bouncing ball (similar to the one in the last lesson) but this time having it follow a sinewave on the upwards motion and give it a slight looping action on the down, as i say i wasn't to sure what this meant....i looked at what i did back in 2009 and reading it again its totally different to what i did back then (meaning is did it really wrong last time round), but heres what i finally ended up with.


Link To Video


So thats it for this week really in the way of practicals.....the other lessons where more of study reference videos and images, a fun class was Timing....i had to time a load of different movements and work out how many frames it would take to do each movement.

As an example, for me to walk from one side of the room to the other it takes me 4 seconds at a normal pace and i use a total of 8 steps which means that the scene would be 96 frames long (at 24 frames a second) and each step would take 12 frames meaning each step would be half a second. this was a really fun excessive and for th rest of the day i was timing every little action i did to fine out how long things would take, its something will be doing a lot more as well until i feel i have a better grasp of timing as i know in the past my timing on my animations haven't been the best but hopefully which these exercises that will improve.

So all in all its been a pretty good week, sadly though my script still hasn't been given me any tasks i think it was a little to high of a random number range so i have taken the max down to 3 so now if its 1 it will give me a drawing task, if its 2 it will give me an animation task and if its 3 it will give me nothing....hopefully this will work better. if nothing comes up by Thursday though i think im going to just set it to max 2 and have it run every 3 days so that i will defiantly get a task every 3 days.

Anyone else who is using my script.....are you finding that its not coming up with a task for you at all or is it working well for you? did you change the number range on the script to get better result, if you did what numbers are you using? i would love to know.

Now in my travels around YouTUBE again i came across the Lynda.com tutorials for Character Animation on there podcast channel, they are just taster videos of the course that they offer (Character Animation Fundamentals with Maya), since the videos where a little scattered around the site i took all the ones that where available on there channel and made a playlist out of them for your guys to watch so i hope you enjoy.


Link To PlayList

Well thats it for this week guys, talk to you all in a weeks time and dont forget to comment about the advert links if you find them troublesome at all.


Thank you.

Animation Salvation, News


Top Of Page


  Missing Uploads and Updated Script..

Jan 17, 2012 by sd | 0 comments | Tweet Post | Share Post | Email Post
So i've finally managed to get the videos that wouldn't upload from my last blog post to upload to YouTUBE, its seems that it was having some problem with the codac i was using (which is odd cos the one that did work & my vlog both used the same one..hmmm).

The first video is from class 4 and covered Straight Ahead Action & Pose-to-Pose action....for straight ahead the task was the have a ball going around the boxes with a keyframe at every 5th frame, this was a really fluid motion between the boxes but there was no structure an the spead of the ball was hard to control.

For pose-to-pose the task was to have a key every time the ball was between the boxes, then to go back and add the breakdowns, this offered a lot more control but there was no fluidity in the motion.

The third one wasn't ask for but i thought i would try and incorporate the 2 different styles to produce a more fluid motion but with a structure to it.


Video Link

The next practical class was class 5 covered Follow Through and Overlapping Action, the task was to animate a 3 bone FK chain across a sinewave, although the bone chain i used was IK it gave the same result....the reason for using IK over FK was because i wasn't sure on how to create a FK chain in Maya as i've not done any rigging in this package before, but i may return to this task again when i figure FK out :)

The animation has keys on each and every frame from 1 - 60 with exception of the first root of the bone chain which only has keys on 1, 5, 10, 15, 20, 25, 30, 35, 40, 45, 50, 55, 60.


Video Link


Now as for the code......during last week when i was using the code i would get an error message after 2 minutes if the button wasn't pressed....this error message would be to say that AppleScript has timed out and the script would no longer work until it ran again.
to fix this small bug i've increased the time span on both of the scripts to 10 hours, this means that if the script where to go off but you where away from your computer for a couple of hours (or 10) then the script would still work when you got back to press the button to accept the task or not.

If you are already using my script then please head over to the page and copy the new one making changes where needed just like before....alternatively if you wish to just add the changes yourself then its quite simple.

For the RandomImage.app script before the first line of the script add..

with timeout of 36000 seconds

The number can be changed to anything you like just know that it works in seconds, so 36000 seconds is 10 hours....to work it out yourself for your own time scale the math is easy 60*60*X=(number of seconds) (x is hours wanted)

Then in that same script on the very bottom line after everything else add...

end timeout

Now just save changes and that one script done.

The next one (the Task script) is a little harder....same principle of just adding those 2 lines of code but they have to be in the right place. So first add the following line just under the second result line.

with timeout of 36000 seconds

so if you have kept the script the same as my example script in the original blog post it would look like this....

else
if result is 8 then
with timeout of 36000 seconds
tell application "Finder"
activate

Once you have done that scroll down to the bottom of the script and add the following just above the second end if...

end timeout

So the last 3 times of the code should be like this....

end timeout
end if
end if

If you've done everything write (and if i've explained it well enough) then the script should perfectly and you should also now have a 10 hour gap between it activating and it timing out.

If you have any questions about this or anything else please feel free to comment below and i will get back to you asap :)

Animation Salvation, News


Top Of Page


  First Week Of A New Scheduled

Jan 15, 2012 by sd | 3 comments | Tweet Post | Share Post | Email Post
I know i said that i would be posting every day or every other day but there hasn't really been much to upload as most of the classes have been reference video study classes or non animation practicals like studying my own body mechanics.....in total there has only been 3 animation practicals i couldn't upload and 2 of them wont upload to YouTUBE for some reason (im working on fixing it as im writing this).

So as for my script i wrote, its working but the variable has been 2 high.....when i tested it using iCal to run the script every 5 minutes for 1 hour i was given a task 70% of the time which was perfect but in practical over the week it has only generated one task and which was a drawing task......so yesterday i changed the random number selection to pic from 1-5 this way i have a 2 in 5 change of getting a task so over the next week it will work a lot better (hopefully), if nothing comes up by Tuesday I will set it lower and if then nothing comes up by Friday i will either activate it myself each day or look into why its not working. (could have something to do with iCal but im not sure, but the script is perfect in regards to its construction and it works like a charm in test).

Anyway....back to the classes, so as i said most of the classes have been focused on looking at reference footage and studying the movements of brake-dancing to understand better squash and stretch, this was a great class as for a long time i always associated squash and stretch with the deformation of mass to give an unusual and impossible form, but this study showed me that we squash and stretch in all aspects of our movement. One of the physical exercises i did was to hop forward on 1 leg, this was to show that when the leg bends that is a squash position and when it straightens out to propel me forward that was the stretch position....then i was asked to try and hop forward without the bending of my leg (the squash) and it was virtually impossible, it was at this point i realized that there is squash and stretch in all aspects of animation and i'll be remembering this and looking for it a lot more when doing my own animations.

Next class focused on Anticipation and how it's a fundamental of movement which is why its a principle of animation, this class one a practical one and i had to animate a ball going across the screen over 5 frames, i attempted this several times but with it only being 5 frames it was moving to fast to make anything out so i changed it to 12 frames so that it registered on screen and i could focus on what was happening.


Link To Video Page

This is one of the only videos that would upload to YouTUBE but as soon as i work out whats different between this one and the others i'll be sure to either update this post with the new videos or create a new post with them one.

The great thing about these classes is that it gives you real work examples to help bring across the principle, like with anticipation the example was given of punching someone in the face (a violent example granted but one that helped explain it very well), if i was to just straighten my arm out it wouldn't course much damage but if i was to move the fist in the opposing direction first then it would have a lot more force behind it. So with an anticipation it gives the movement a lot more power then without.

Although these things i have studied many times before, since i neglect to go over them time and time again i tend to forget them but with this new class scheduled im really getting back on my feet.

Classes this week covered the importance of staging and how the classic comedic movie stars such as Charlie Chaplin and Laurel and Hardy would stage things in such a way that it was noticeable and registered by the audience without it needing shoved in your face, this is something that lends its self to staging in animation and studying these greats i have got a better understanding of what it takes to create stronger staging.

The rest of the classes required practical work (which are the ones i haven't been able to upload), such as Straight Ahead & Pose-To-Pose and Follow Trough & Overlapping Action.....in these classes i was asked to move a ball around 4 boxes in a straight ahead fashion and then do the same again using pose to pose, each of these has there advantages and disadvantages but for me i have been using a combination of the 2 for a few years now and its the way i like to work but to go back to one or the other for this task was a fun exercise that took me back to the basics and really helped. As for follow through and overlapping action i was told to create a 3 bone chain and animate the movement of it along the image of a sinewave (imaged below) as this was a great start to understanding overlapping action, this is something that will be gone over in a lot more detail in future classes.
Next week i believe i go into the principles of bouncing balls but i've not looked at the class layout so i can't be sure until the day. but thats all the classes for this week.

like i said, i will be changing the script i wrote and to see if i can make it happen more often then 1 time in a week and i'll upload the videos to the blog once i've got them working on YouTUBE.

As kind of a Animation Spotlight thing i would like to mention some really great tutorials online for you to use and check out, i found these on YouTUBE during my daily hunt and thought you might like to check them out as well.

firstly we have an animation student at Animation Mentor called Matthew Hamilton who is doing a Tips and Tricks class in Maya, every few days (sometimes a little longer) he's uploading a tutorial video going over useful tips and tricks that you can use in Maya such as the Animation Reference System which i was unaware of until recently, he takes you step by step through it all and makes it very easy to follow.

His Art Blog: http://hammunition.blogspot.com/
His YouTUBE Channel: http://www.youtube.com/user/mattJhamo/featured

and here is a video just to show you what i mean....


The other YouTUBER i wanted to mention is LearnMaya1 who does really nice tutorials on character animation going through blocking poses out from start to finish and in the future they will be moving onto other passes of animation.

LearnMaya1 Website: http://www.3daide.com/
LearnMaya1 YouTUBE: http://www.youtube.com/user/Learnmaya1/featured

Finally a video i came across of industry animators Ronnie Williford and Frank Gabriel teaching Timing for Animation and Animating Dialog, these videos are part of the PowerHouseAnim Channel which has a load of other really great lessons on there that i strongly suggest checking out.

Ronnie Williford - Timing for Animation: http://youtu.be/HqGh3hRHExs
Frank Gabriel - Animating Dialog: http://youtu.be/tINoTLKoxTk

1 Last thing before i go, for those looking to do life drawing but classes aren't in your local area or they are but just cost to much, there is a free 24 hour trail at this great site that offers videos of models in different poses but the best thing is that the videos revolve around the model 360o degrees so you can pause and draw then play find another position you like and then pause and draw again. the free trial offers 2 different models to draw from a female model called Charlotte and a male model called Costa, they pull some really great poses and offer you a lot to draw from.

all you need to do for the trial is enter your email address and your done...after you will have 24 hours members access to the site, and if you feel that its worth it (which it is in my opinion) you can subscribe for as little as $6.

Check it out: http://lifedrawingposes.com/free-trial/ (there is a sample video on the site so you can see what you get)

and if you still want more then i would suggest checking out this video by Sycra who goes over some life drawing in Photoshop just showing you there process, check out there main channel as well as there are a load of great videos to study from.


Sycra Life Drawing Video: http://youtu.be/XrHsumJ2HBg
Sycra Channel: http://www.youtube.com/user/Sycra

Anyway, thats it guys and gals....i hope you all have a great week and i'll talk to you again soon :) 

Animation Salvation, News


Top Of Page


Help Me Promote Monkey Boy Animations Monkey Boy Animations

Copy & Paste code onto your site.

Animation Salvation

Animation School

Last 5 Posts

Loading...

Post Topics

  • 11 Second Club Animation
  • Animation Salvation
  • Animation Salvation 2009
  • Download
  • Final Year Project
  • News
  • Off My Chest
  • Reviews
  • Tutorials
  • University
  • Work In Progress

Sites Of Interest

  • My Portfolio
  • My Personal Diary
  • My Final Year Project Blog
  • Creative Character Animation Work (Uni)
  • Animation Salvation
  • Animation Salvation v1.0 - Post Backup

Blog Archive

What I'm Saying

Follow me on Twitter

My Places

Followers


Click Flag For Translation Of Site
Back To Top | Login | Copyright © 2010 Monkey Boy Animations Blog Wordpress Theme Customization | Blogger Template Credits For