
These are backup posts from the original Animation Salvation. If there is anything you remember posting or seeing on the old Mentorium and would like it back let me know and i'll go back it up.
Arm Rigging
Just came across this link and though that it might be helpful to others, its for XSI but i feel that it will be able to be understood and used for other packages.
this is a PDF file so make sure you will be able to open it
LINK HERE
Pixar Style Eyes
Hey all i just came across this link for modeling and rigging Pixar Style Eyes....you know that it will look awesome if done right cos pixar just have got it right with there characters as they just look awesome.
anyway im rambling as its late and i've been character modeling all day so i'll just shut up and give you the link.....enjoy ^_^
HERE
Great Tutorial Website
hey all got another link for ya, this is one that Matthew sent over to me when i was having trouble rigging my character, the tutorials are a little confusing to me but you might have a little better luck with them and i hope you do.
anyway here's the link guys.......HERE
Face Rigging Tutorial - Best EVER ! ! !
hey guys and gals i just came across this thread on XSI-Base about Face Rigging and without a doubt it is the best i've seen, its perfect for those people who can't afford FaceRobot.
i believe that all these principles can be moved over to Max and Maya but as i haven't used them before i dont know for sure.
the link to the thread is HERE and the links to the videos are within it across the 1st 2 pages.
personally i have used this tutorial only a little so far but since my character is of an unusual shaped face i had to change the first section of the tutorial to soot my needs, what i did was i used Curves/Splines (depending on the program) to draw out the shape of the mouth then duplicated it and rescaled it then tweaked it then repeated it again and again then once i had 4 curves/splines (4 was what i needed you might want more) i used the Surface Mesh Loft option in XSI to create the Surface mesh from video 1, this was a quicker way for me to do it but you may find a quicker one but i hope that it helps you out if you find the video technique hard to do, just ensure that you select the curves/splines from largest to smallest when making your Surface Mesh so that when you connect the Null to it, it wont start from the mouth it will start from the head. (like in the videos)
anyway as always enjoy guys and gals and i'll talk to you all soon.
Toom Arm Deformation
I thought that this might be of some use to people, its XSI based but the principles should be able to be used in other packages.
its a video tutorial on creating a bendy (rubber hose) arm effect.
like this:-
hope it helps you out.
http://www.screencast.com/t/EWZxuqR2LHw
Setdriven Keys To Make On/Off Controls
Ok, so this will finish the tutorial on setting up the arms. Before I went over an easy way to set up the arms, just drag and dropping in the outliner, now we are gonna get into some more complex/practical forms of rigging. Now you may need the arm to switched to what its constrained to over the course of your shot. So here is the method I use.
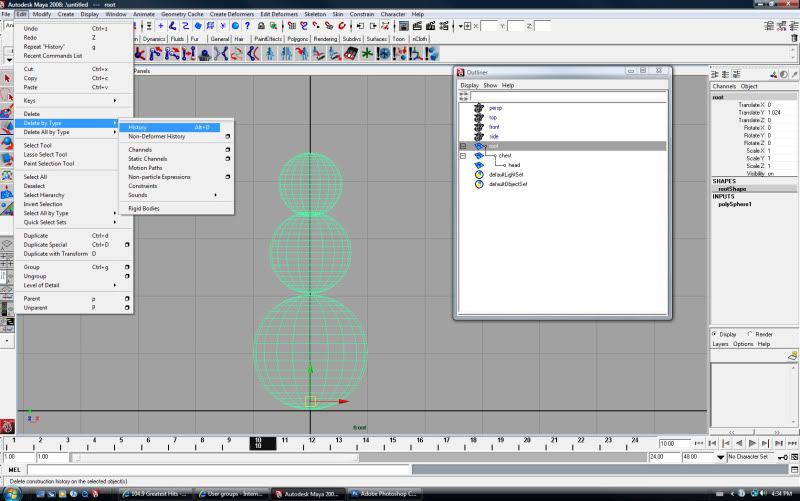
I've set up a simple snowman character you can see(just 3 circles). Just to go over a couple basics for those completely new to maya. I've moved there pivot points to the base of the sphere, just so I can rotate them the way I would like, otherwise by default they will move around from the center of the ball, which isn't a great looking way to move. So to do this, press the insert key, your tool in the viewport will change, and you can move the pivot point around no to where you would like it.
Lets say I have modelled these circles I just created, before doing any rigging I would want to go in and delete the history/bake it for xsi users, just so all that data of whats happenned isn't being carried around. So thats under edit/deletebytype/history in maya. If you fail to delete history on modelled objects, you will be carrying around a lot of info, every pull, every line added. When you start to animate maya will be very, very, very slow. So it's a good habit to keep your geo clean.
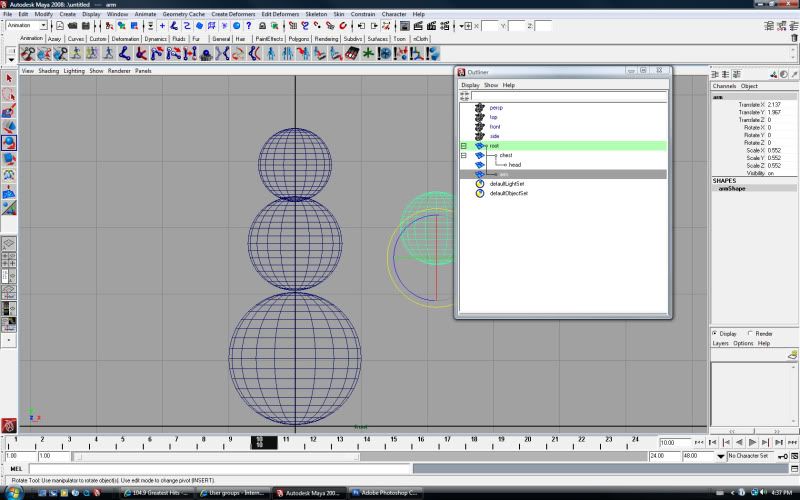
So I made another ball that will serve as the arm. I've put it into the roots heirarchy, so by default that will be the arms world.
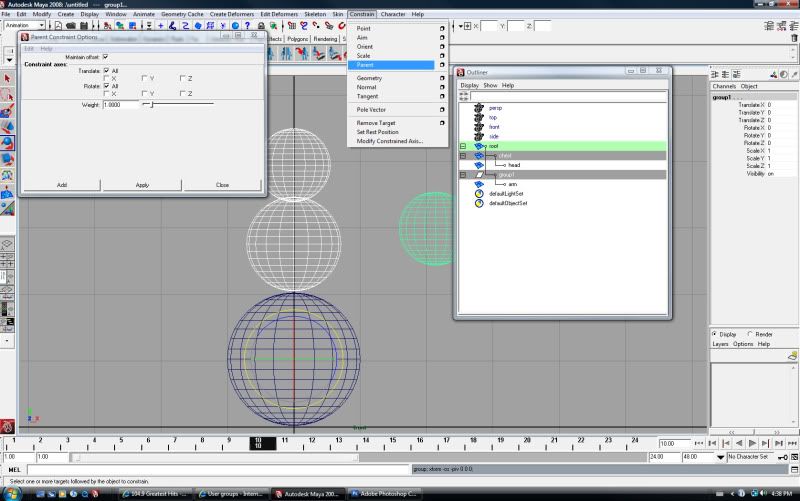
Now we have our rig, and our arm. We now need to get some contraints to work with. Before we set our constraints, we need to create a group for our object, cause it isn't our object we want to constrain, its our objects world. If we set the constraint on the object itself, we won't be able to animate it, and that's just stupid. In this case we will be using parent constraints. We will use parent constraints as it will follow all of the parents behaviour, be it rotations, translations, scaling, and that will give us the movement we want. Thats found under the constrain tab, notice the box next to parent, make sure maintain offset is selected before applying our constraint, if not when the constraint is turned on our object will start jumping all over the place, which we dont want.
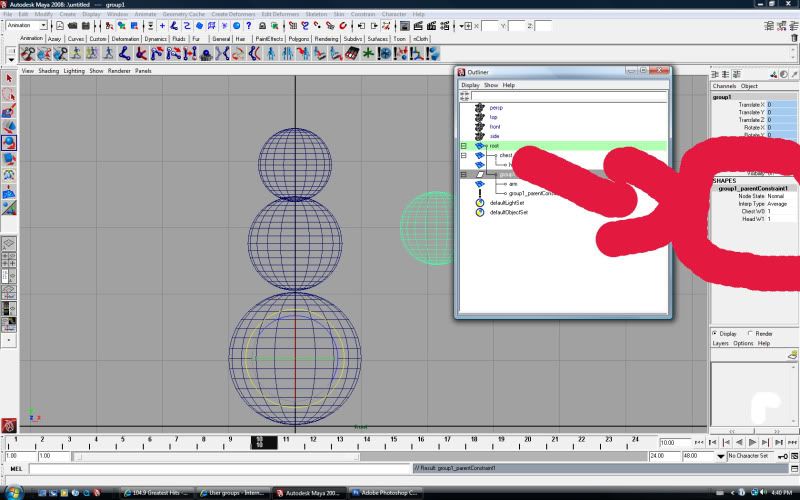
So I have selected the chest, and ctrl clicked the group in the outliner and applied a parent constraint, while maintaining offset. Also I have done this with the head as well. Now that the constraints are applied you will see some new data that wasn't there before in the channel box for the group.
This tells us that there is a head and a chest constraint to the group. Also you will see a 1 beside it. The one tells us that this is on. If we turn the 1 to a 0, then its off. If both are off its default world is the root. So now we have a means of controlling the arms world, without moving it around in the heirarchy. And right now we can animate those controls. But its not very convenient. As we won't be clicking on the group, and we can only access the group from the outliner, so we need to make this much more user friendly.
To do this we will need to set up a new control for our arm. SO to do this, go to the channel box of the arm, right click and find attributes and add attribute. Now a new box will open, name the control chest constraint or whatever you want it to be called. Also make sure you choose the boolean option, there are many other options and we wont get into those right now, but a boolean is a simple on/off option.
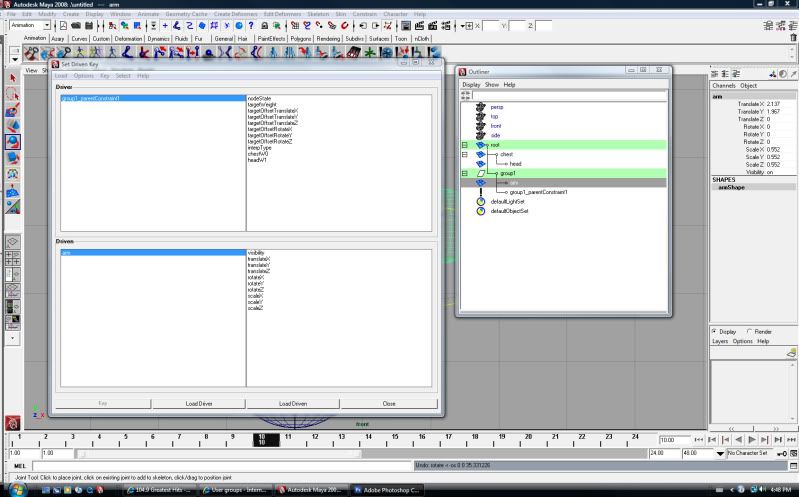
Now we have our useless attribute in the channel box, so lets give it a purpose. We need to make some set driven keys for this. So find the animate tab, set driven key, set. A new box will open. This part is a little tricky. You will see a load driver button and a load driven button. The driver is what we are wanting to use to control, so obviously the driver will be on what we want to animate with, so our arm control. Select the arm control, and click load driver. Now we need the constrain to be the driven. So find the group our arm is in in the outliner, open it and you'll see group1_parentConstraint1 click on that and load that as the driven. This part is a bit tricky now.
select the chest constrain attribute we made turn it to off, select the constraint and turn the constraint off by turning it to 0. Now hit key in the option of the set driven key box. Also make sure you have them highlighted in there respective box in there as well. Now turn the control to on and the constraint to on, and click key once more. Now you can close the set driven key box, and you have a keyable animatable control for your arm in the channel box. Now you can do your head, your hips, your knees, your neck, your feet, whatever you need your arm to be constrained to.
I know that was a lot of data, to go over in such a short tutorial, if you guys need anything elaborated on at all, please do ask.
Happy animating!
Arms Following random body parts
This thread isn't about how to rig an arm. I assume you have your arm rigged, and can be implemented on any character after the rig is done and weights are painted.
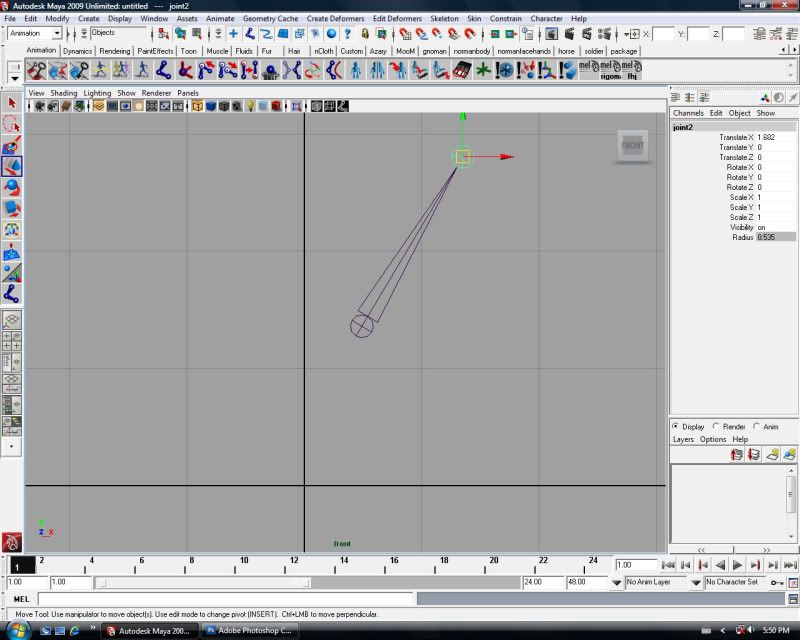
First I want to explain a very simple concept about the 3d world. Everything in a 3d program has a world that it is related to. When you see something is at 30 X 0 Y 0 Z than you know its 30 X away from its world. To illustrate this note the image below.
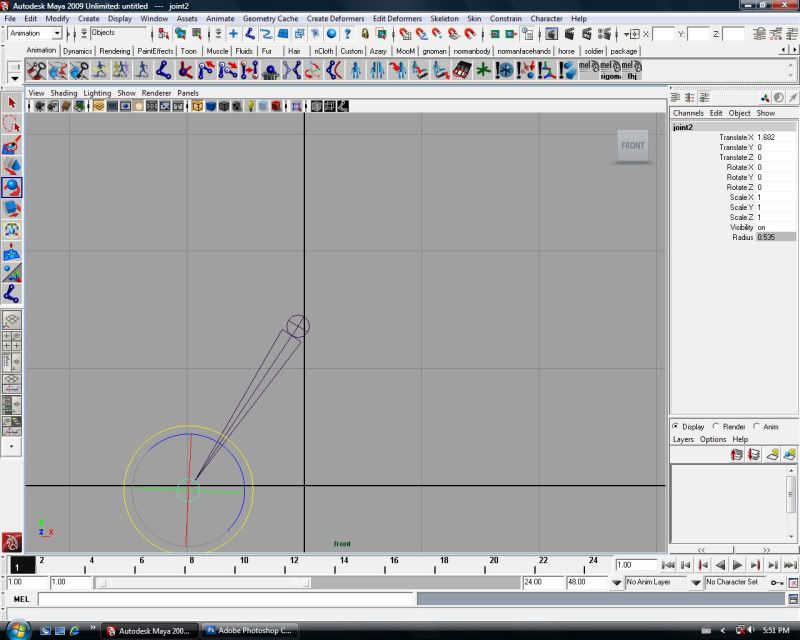
notice the translations on the second joint, those translations are not in relation to the center of the grid, like the first joints translations are. The translations on the second joint are in relation to the first joint. So notice when I move the first joint, and rotate it the translations on the second joint are unchanged.
So why is it that despite the fact that it is a completely different place on our 3d grid, that the numbers in our channel box are saying that it hasn't even moved?
Its because in theory it hasn't moved, it's world has(the first joint we created).
So now we know that we can move objects without even directly touching them or moving them. So now its just a matter of practically implementing that knowledge in terms of our characters arms.
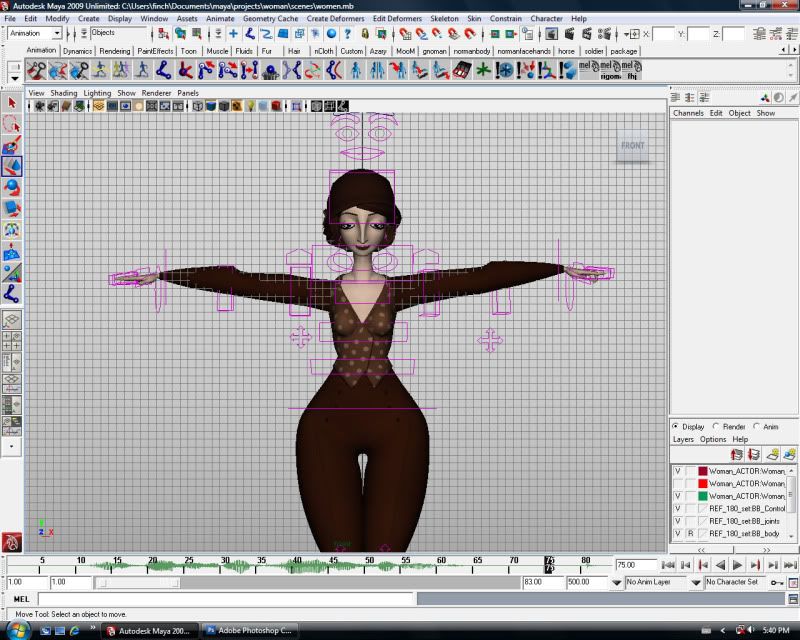
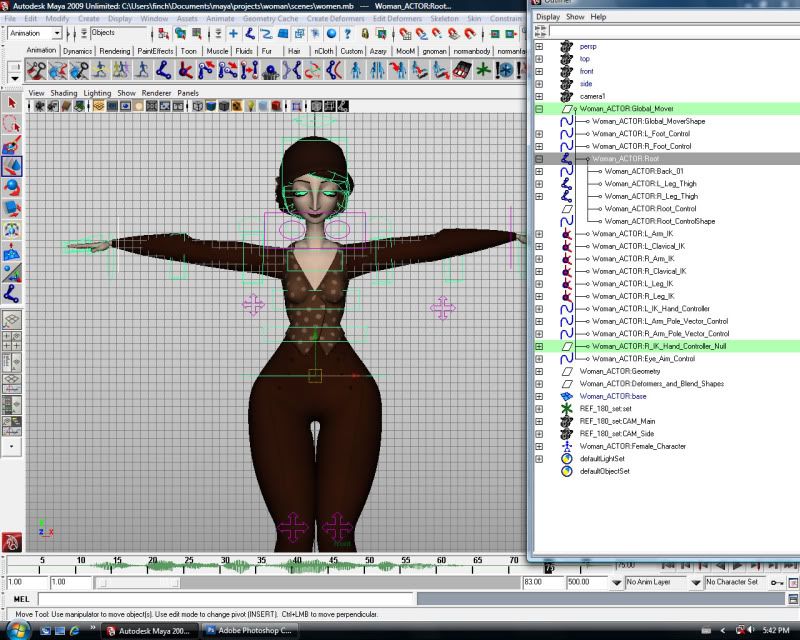
Here's the character I have chosen to illustrate how to do this with. I chose this character because it doesn't have an option in the channel box to switch worlds for the arm with, which a lot of the rigs you work with won't have.
Open your outliner, select the root control, and notice the outliner will change color so you can quickly find it in the rigs heirarchy, now select your arm control you want to follow the root.
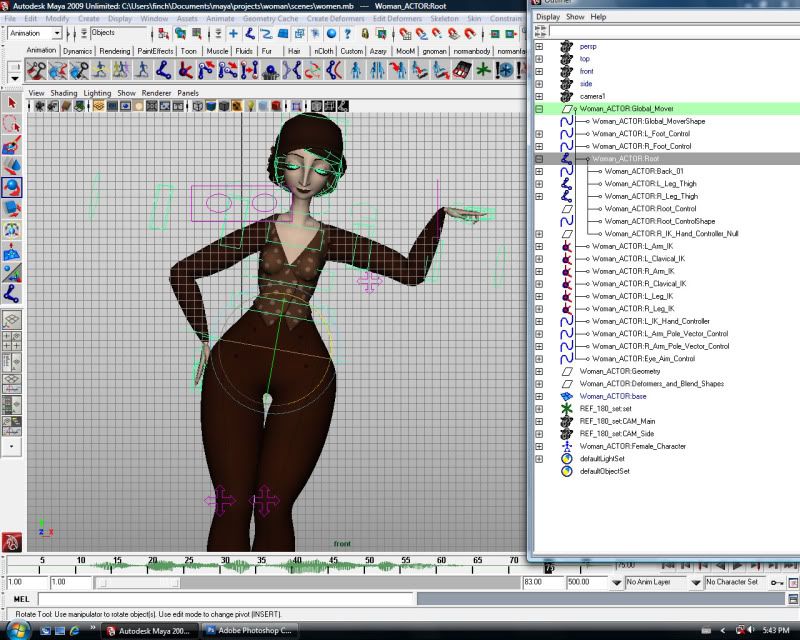
Drag the arm control over top of the root control in the outliner. I dragged the arm down the root and moved the root after and notice how the arm follows it.
Now to drag the point home so you can see how you can implement this with anything you want, I will do the head.
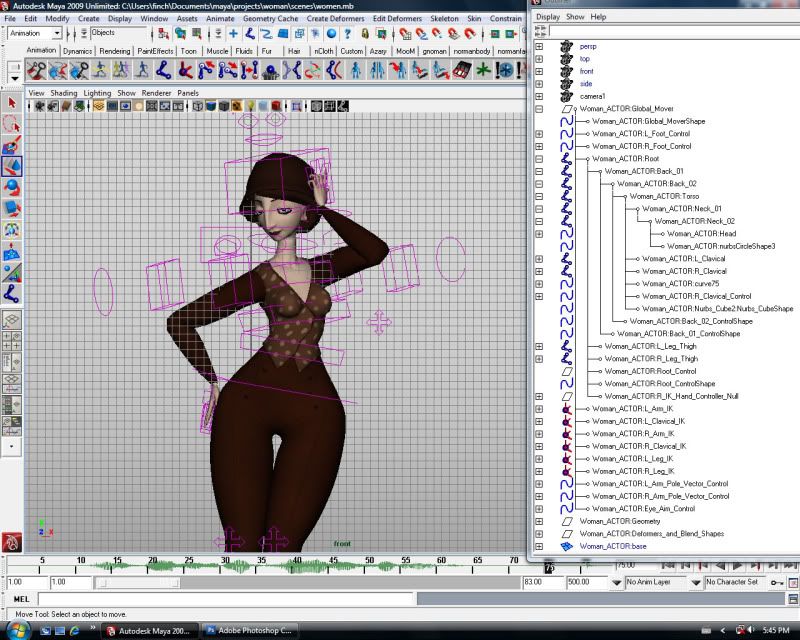
Same thing, I select the head and find it in the outliner and drag and drop the other arm over top the head. Now I'll position the arm onto the head and notice I can rotate it or translate the head and the arm follows, even when I move the root or the back or the neck.
That is just a very quick and very easy method of setting up your arm for your shot of animation, if it doesn't have a control built into the rig for automatically doing this. Obviously you would want to figure out your shot and chose the appropriate control to have your arm to follow before you start animating. You can also switch what you want your arm to follow in your scene but that is much more complicated and I can explain that in a later post. This would involve set-driven keys and setting up more controls on the arm that automatically turn several constraints on and off. Hope this helps you guys out.
I forgot to cover a question I was asked about how to have the arms not following anything on the rig. You can simply create an empty group or a null and have the arm under that empty group or nulls heirarchy. This may pose a problem that the arms dont follow the move all, so place that empty group or null in the move alls heirarchy and that will solve that problem.
Links
hey just wondering why this forum is empty, i thought i would get this place started with a couple of links to other sites that are a lot of help for users of XSI like me.
www.vast.ws/resources/xsi/tutorials/tutorials.html
there are some issues with the site as i am unable to access it outside of my university unless i use a Proxy on the site so if you do have problems loading it and i really do recommend looking at it you might want to install this and run it.
www.hotspotshield.com/
im a trusted user and not trying to get you to install anything harmful to your computer and i hope this is a very helpful site to you all.
any problems let me know
Useful Links
I thought i would start this one off, i have a couple of links that people might find of some use to them as they where helpful to me.
this one says 3D Max but it really doesn't require any specific software so enjoy and good luck. it covers how to do face modeling and i must say it really give a lot of useful information so i would like to pass it onto you guys.
Head Modeling
This one is all about the character from head to toe, now once again this one says that its for Maya but really any package can do it so if your not using Maya please don't worry you'll easily follow it, personally i use XSI and i manage with all these links so if i can do it im sure you'll be ok.
Body Modeling
This video is not for modeling a human i know BUT the techniques used for it are available in all the packages i know about. if it isn't any good to you then im sorry but if it is then enjoy.
I just came across this one so im not 100% on how good it is but i hope that it is of use to you. are you trying to create a Low Polly Character, maybe you have a slow computer or maybe you haven't got the time to render out a mass amount of polygons due to a heavy time schedule, anyway whatever the reason i hope this helps you out (sorry if its rubbish).
anyway thats all i have right now but keep checking back for more and if you know any please please please post the link as i said the more links the more help.
More
Hey thought of another REALLY REALLY useful link, i used this for my last character and it turned out really well, but i was a little over adventurous on my character design and have decided to do a new design and model.
anyway on with the link, this website is called Mesmer. i dont know how many people have heard of this site but it has a really great tutorial for character modeling, it overs all the basics first then goes into detail of modeling your overall character.
here is the link, so please enjoy. (i say that a lot just i like people to enjoy ^_^)
its XSI based but can be used by ANYONE ! ! !
Mesmer
Even More
Not really a link but a useful set of videos that i hope are a lot of help to you.
Ear Modeling Made Easy
Face Modeling Part 1
Face Modeling Part 2
If your new to modeling as i am i really recommend using this technique of drawing out the geometry onto your rotoscope image then fill it in with polygons, this helps you to keep track of where everything is meant to go and also its quicker then trying to work out the placement as you go along.
i hope that these videos are of use to you.






 What I'm Saying
July 2011 Showreel